InspireMe Monday ~ FREE Cell Phone Covers

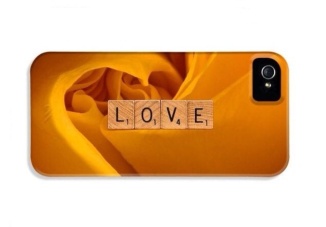
LOVE-Yellow Rose

“LOVE-Yellow Rose”

Part of my InspireMe line of photos, you can customize any photo at onyonet.com. I picked this rose from our garden because of the gorgeous color and the heart shape formed by the petals. Nothing says LOVE quite like a rose.


Starting tomorrow you’ll be able to get a FREE cell phone cover to match the artwork you buy at onyonet.com

Details in tomorrow’s post. No, this is not an April fools joke.

~ Daniel Kmiecik

The Photographer’s Wife

Easily one of the funniest and truest things I’ve ever read…and I’m the photographer šŸ™‚ Great belly laugh for those who understand and are living it. Well done Michelle

Mike Moats

Hereā€™s a great post that was on naturephotographers.net a couple years ago, and thought you all would like reading it. Thanks Michele for this great insight as a photographerā€™s wife.

Photographerā€™s Wife
by Michelle Blanchard

Yes. I know not all photographers are men. But, being that my husband is one, Iā€™ve learned that a photographerā€™s wife:

Knows that a ā€œgoing for a walkā€ really means ā€œstand for long, long periods in one spotā€.

Becomes accustomed to seeing her husband lay on his belly in public places.

Knows that ā€˜the lightā€™s goneā€™ doesnā€™t mean itā€™s dark.

Has learned that photography involves expensive gadgets which break, are easily lost, and are used only once in a very great while.

Has learned that photographic equipment multiplies and eventually fills up what used to be the guest bedroom.

Is resigned to the fact that camera manufacturers build obsolescence into each piece of equipment, andā€¦

View original post 170 more words

Inspiration Strikes Again! ~ Ceeā€™s Odd Ball Challenge

Candied Egg

Candied Egg

Crumbs from a cookie with candy coated chocolate got dumped into the sink along with the egg shell.


I was just going to rinse some stuff off in the kitchen sing and BAM! I saw this egg shell with all the colors in it and thought it looked pretty cool. After getting the photo in camera I figured out the colors came from some cookie crumbs that had candy covered chocolate in them.

This is another case of “shoot it now”. I just looked back at the egg and the colors have all faded. If I didn’t stop what I was doing to get this shot I would have missed it.

~ Daniel Kmiecik

WordPress Image Size “upgrade”

Long story short, when I learned how to create web pages I learned in Notepad. There were no GUIs (Graphic User Interface) at the time. When GUIs came out I thought it was the greatest thing since sliced bread. However, GUIs mess up, and as we all see on WordPress GUIs can be changed without notice. Knowing the actual text (code) behind the GUI allows you to figure out how to fix what’s gone wrong. Very handy when nobody else is helping.

I have figured out how to fix the problem caused by the WordPress “upgrade” in a post and on the front page of my blog. I say my blog because what follows is for a very specific set of circumstances. It might help you, it might not. If you know at least a little about html code, you may be able to use this information.

Here’s the givens for my blog:

    I use the free Visual theme
    My photos are sized to be 1280 pixels on the long side
    I create my posts in the text editor, not the Visual editor
    I add my photos to my post using the Add Media button and select the previously uploaded photo from my library
    The default width for photos in the Visual theme appears to be 670 pixels. Don’t quote me on this is the “default width” for the theme. I’m not sure if that’s where the 670 is coming from for sure, but I know this formula works so I’m sticking to it.

Now to the fix:

I’ve had to strip some of the stuff that makes the photo appear in the post instead of the code, but I think you’ll get the point. If not, please feel free to comment or email your questions. I’ll do what I can to help you out.

The code as it is after clicking the Add Media button in the “upgrade” version:

This results in the photo appearing like this:

"LOVE-Autumn"

“LOVE-Autumn”

onyonet photo studios InspireMeĀ is my latest collection of photos. Meant to inspire and motivate you and your family, they are sure to spice up any room in your house.


Obviously not what I’m looking for.

We need to change some key parts of that code up there. First we need to change the align attribute:

    Change the align=”alignnone” width=”150″ to
    align=”aligncenter” width=”670″

The aligncenter will center your photo. The width=”670″ will make the photo the correct size for the post. Apparently 670 is the width set by the Visual theme. This is why I say you may need to adjust things a bit.

Next you need to change the end of the <img src="https://onyonetblog.wordpress.com/wp-content/uploads/2014/03/love-autumnlove-autumn-onyonet-photo-studios_blog.jpg?w=150 line. Currently this line ends with ?w=150. All you need to do here is remove the ?w=150.

Finally, you need to change

    width=”150″ height=”107″ class=”size-thumbnail wp-image-860 to
    width=”670″ height=”478″ class=”size-full wp-image-860

The width is always 670. The height will change depending on actual size of the photo. If you click on the photo in your library you will see the actual size in pixels in the sidebar on the right side of the screen.

Time for a little math. Sorry to those who don’t feel they’re strong in math. It’s not too bad, and your calculator will do all the work for you.

This particular photo is 1280 (because I told it to be when I exported it) by 914 pixels. Since we know the width will always be 670 pixels in the post we can use that as an anchor of sorts. To get the height=”478″ we need to calculate the percentage change in the width. To do this, using your calculator, type in 670 and divide that by 1280. The answer will be 0.523.

To get the height, clear the calculator and then type 914 (the actual height of the photo) and multiply by 0.523. This will result in 478.421. Just drop off the numbers after the decimal, it will be close enough for our purpose.

After you make the changes the photo will appear like this:

"LOVE-Autumn"

“LOVE-Autumn”

onyonet photo studios InspireMeĀ is my latest collection of photos. Meant to inspire and motivate you and your family, they are sure to spice up any room in your house.


Much better eh?

For every landscape oriented photo you use at 1280 pixels wide, you will multiply the actual height of the photo by 0.523 and use the result in the height= attribute.

For portrait oriented photos I have to calculate both the width and the height attributes because I output everything at 1280 on the long side. Since the long side goes down the page for portrait photos, the width is different most of the time.

So, let’s say you have a portrait oriented photo that is 853 wide x 1280 high. We know the width, 853 in this case, will be 670 pixels in the post. To get the the width and height attribute numbers:

    Divide 670 by 853. This equals 0.785
    Multiply 1280 by 0.785. This equals 1004.8. Round it up to 1005.

Your width attribute will be width=”670″ (given by the theme settings). Your height attribute will be height=”1005″.

Your portrait oriented photo will look like this:

Wind in the Palm Tree

“Wind in the Palm Tree”

The wind was blowing so hard the trunks of the palm trees were swaying. You can feel how strong the wind was blowing looking at this photo.


I hope this helps ease the pain for at least some bloggers. Good luck and keep blogging!

~ Daniel Kmiecik
Thoughtful Thursday ~ WordPress Changes

WordPress has made changes to the image editor. These changes have made my photos appear in thumbnail form automatically.

It will take me a few days to figure out how to deal with the changes so the blog will still look good, at least look like I want it to look. This might mean a change to the theme itself.

The address won’t change so you can keep following and keep coming back to check on my progress. It’s doubtful I’ll be able to figure this out while working on my iPad which means I can only work on it at home.


Thanks for your patience during this transition.

~ Daniel Kmiecik

Wednesday’s Impressions ~ Double Exposure

"The Last Black-eyed Susan"

“The Last Black-eyed Susan”

This was the last black-eyed susan of the year in our garden. This impressionistic photo is created using a double exposure technique.


This technique for creating an impressionistic photo might be the simplest. If your camera has a multiple exposure function this will be very easy. If it does not, you’ll have to use a layer-based photo editor (like Photoshop) or some other way to combine two or more photos. Today I’ll cover using multiple exposure, the way this photo was created. Tomorrow I’ll give you some tips on how to accomplish a similar effect in Photoshop.

For this multiple exposure you’re going to release the shutter only twice. Once to create the sharp part of the photo and the second time to create the blurry impressionistic effect. If you exposure time is fast enough you don’t even need a tripod for this.

    1. Set your camera to Aperture priority mode
    2. Select a subject and use your in camera meter to check the exposure shutter speed. When you set the multiple exposure function in aperture priority to use two shots, the camera will half your shutter speed automatically. So you’ll want to sure you can hand-hold your camera at half the shutter speed that your meter has selected. You can take a few test single exposure shots with different apertures to find a good shutter speed.
    3. Set your camera to manual focus and turn on your multiple exposure mode set at two exposures.
    Note: The next two steps happen in a quick succession. So make sure you know how to accomplish them without taking your eye off the view finder.
    4. Aim your camera at the subject, focus where you want the sharpest area to be and release the shutter for the first exposure.
    5. Without taking your eye off the view finder, defocus the lens so the everything gets blurry and release the shutter for the second exposure.

How blurry? That part is up to you. It’s your vision and your decision. I suggest creating several versions of this photo and selecting the one you like best later.

The blurry part of the photo will have an overall softening effect. It will also help hide any unwanted distractions in the final photo by making them far less noticeable.

If there are any points of light, like those caused by the reflection of the Sun on a water drop, those points will turn into large circles. The size of the circle will depend on how much you defocus. The more you defocus the larger the circle. Using a mirror lens, like in this photo, the circles become rings due to the mirror blocking the center of the lens itself.

There will be a defocus point where everything just becomes color of an undefined shape. You can use this to create a kind of in-camera background or overlay of colors. The overlay of colors will mix with each other and with the colors from the first exposure and soften all the colors a bit making them less saturated.

Go out and give this a try if you’re interested in impressionist style photography. Try changing things up by using more than two exposures or making one exposure longer than the others. I purposely used a higher ISO to create more noise in this one to get a grainy look. I’m sure there a lot of ways to play with this that I have yet to think about. Keep shooting and have fun!

~ Daniel Kmiecik